

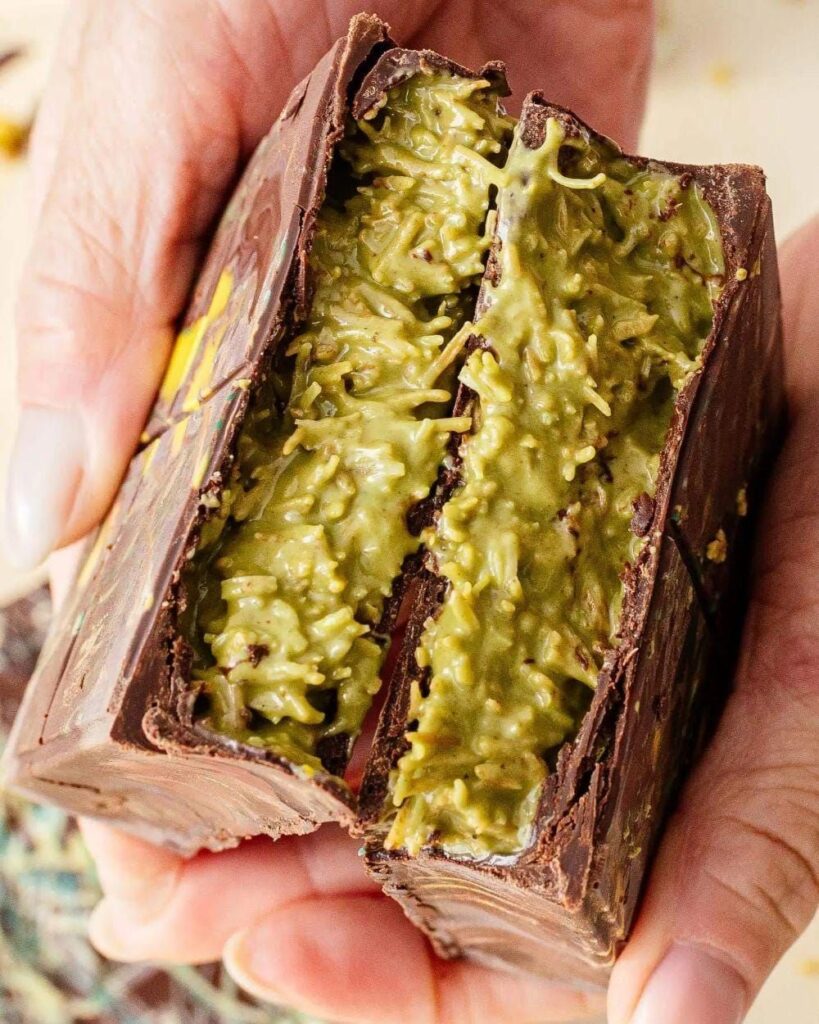
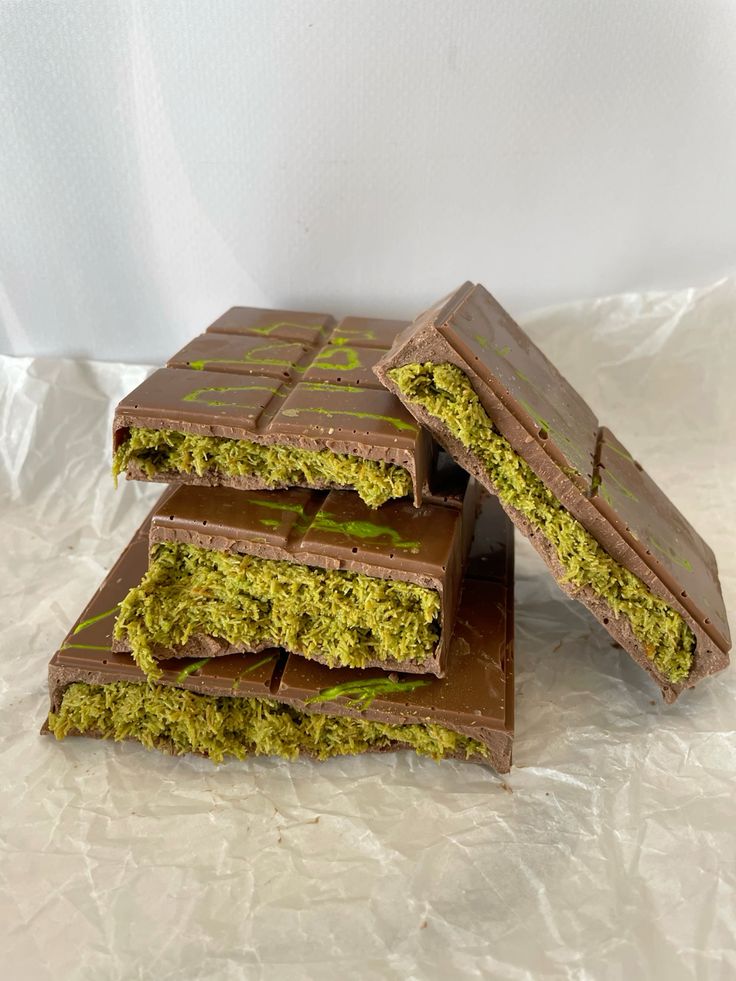
If you’ve been anywhere near social media in the past year, you’ve definitely seen that gorgeous green chocolate bar. You know the one — cracked open to reveal a thick, silky layer of pistachio cream and crispy golden kataifi noodles tucked inside a thick shell of dark chocolate. That, my friend, is the Dubai chocolate bar, and it has taken the entire internet by storm.
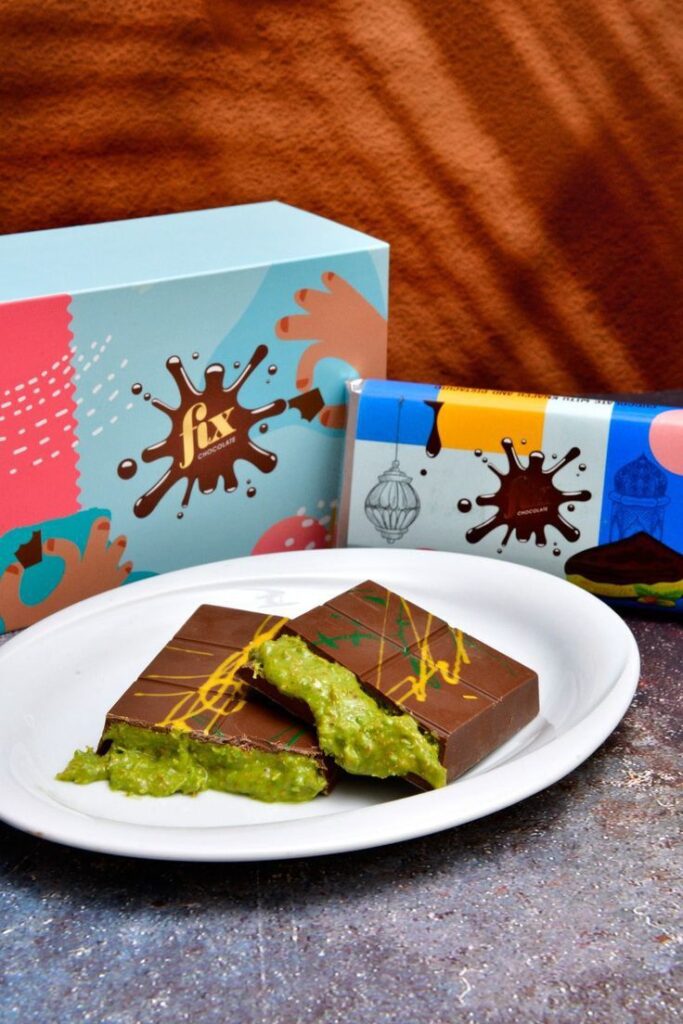
The original bar is made by FIX Chocolatier, a small chocolate brand based in Dubai. It became a full-blown viral sensation almost overnight, with videos of people snapping it in half racking up millions of views. The crunchy sound alone is enough to make your mouth water.
Here’s the thing — the actual bar is hard to find outside Dubai and extremely expensive when you do track it down. That’s why this homemade Dubai chocolate bar recipe has become one of the most searched food recipes online. And honestly? The homemade version is just as incredible. Sometimes even better.
In this guide, you’ll get everything you need to make this viral treat at home — from the full ingredient list to pro tips, flavor variations, and common mistakes to avoid. Whether you’re making it for a dinner party, a gift, or just for yourself on a quiet weekend, this recipe delivers every single time.
Why Everyone Loves Dubai Chocolate Bars
There’s a reason this chocolate bar went viral, and it’s not just the aesthetics (although they are stunning). It’s the combination of textures and flavors that makes it genuinely unforgettable.
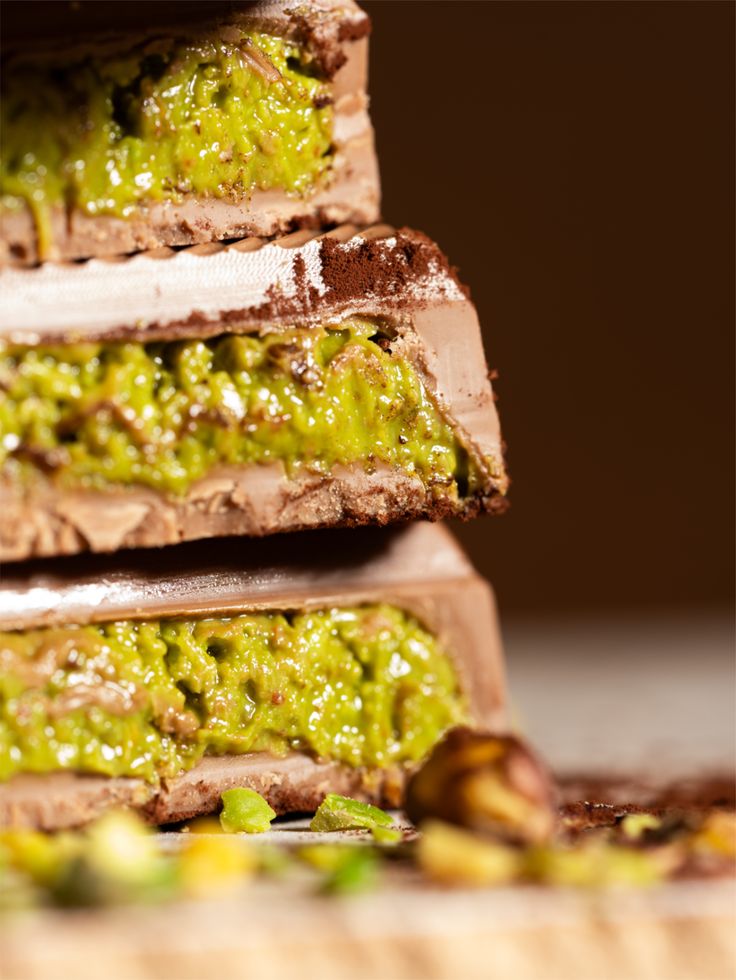
You get the deep, slightly bitter richness of dark chocolate on the outside. Then you break through and hit that incredibly creamy, nutty pistachio filling. And right in the middle? A layer of crispy, golden kataifi pastry that adds the most satisfying crunch you’ve ever experienced in a chocolate bar.
It’s that contrast — smooth and crunchy, sweet and slightly savory, rich and light — that makes people completely obsessed.
Beyond the taste, there’s something deeply satisfying about making it yourself. The whole process feels like a creative project, almost like edible art. It’s the kind of thing you can proudly photograph, share, and gift to people who will genuinely be amazed you made it at home.
What Makes This Recipe Special
This isn’t your average chocolate bar recipe. The secret weapon here is kataifi, a shredded wheat pastry used widely in Middle Eastern and Greek desserts. When you toast it in butter, it transforms into something magical — ultra crispy, deeply golden, and nutty in the best way.
Combined with pistachio cream (or homemade pistachio paste), the filling hits a perfect balance between rich and light. It’s not overwhelmingly sweet. It’s nuanced, almost like a high-end candy bar you’d expect from a Michelin-starred pastry chef.
What also makes this recipe stand out is that it’s achievable at home without any professional equipment. You don’t need a tempering machine or a candy thermometer. A silicone mold, a microwave or double boiler, and a few quality ingredients are all it takes.
Ingredients You’ll Need
Here’s everything you need to make approximately 6 to 8 large chocolate bars, depending on the size of your mold.
For the Chocolate Shell:
- 400g (14 oz) dark chocolate, 60–70% cocoa — high quality makes a big difference
- 100g (3.5 oz) milk chocolate — optional, adds sweetness and creaminess
- 1 tablespoon coconut oil or cocoa butter — for smooth, glossy melting
For the Pistachio Kataifi Filling:
- 200g (7 oz) kataifi pastry — shredded filo/wheat pastry, found in Middle Eastern grocery stores or online
- 3 tablespoons unsalted butter
- 250g (1 cup) pistachio cream or pistachio spread
- 2 tablespoons tahini — this is the magic ingredient, don’t skip it
- A pinch of salt
- 1 teaspoon vanilla extract
Optional Add-ins:
- 2 tablespoons crushed pistachios — for extra crunch and garnish
- A tiny drizzle of white chocolate for topping
- Edible gold dust or flaky sea salt for finishing
Kitchen Tools Needed
You don’t need much, but these tools make the process smooth and stress-free.
- Large silicone chocolate bar mold — a 6-cavity or 8-cavity bar mold works perfectly
- Double boiler or microwave-safe bowl
- Medium non-stick skillet or pan
- Spatula or wooden spoon
- Pastry brush — optional but helpful
- Offset spatula or the back of a spoon
- Refrigerator or freezer
Step-by-Step Instructions
Step 1: Toast the Kataifi Pastry
Start by pulling apart the kataifi pastry with your hands. It comes in long threads, so break it into smaller, loose pieces — roughly 1 to 2 inches long.
Heat a skillet over medium heat and melt your butter in it. Add the kataifi and toss it continuously with a spatula. You’re looking for a deep golden color and a wonderfully nutty aroma. This takes about 5 to 8 minutes.
Don’t rush this step. Low and slow is the key to getting that perfect crispy texture without burning. Once golden and fragrant, remove from heat and let it cool completely.
Step 2: Make the Pistachio Filling
In a mixing bowl, combine your pistachio cream, tahini, salt, and vanilla extract. Stir everything together until smooth and well combined.
The tahini here is not just a filler — it adds a slightly earthy, sesame-flavored depth that makes the whole filling taste more complex and less one-dimensional. Trust the process.
Once the toasted kataifi has cooled down, fold it into the pistachio mixture. You want to preserve as much of that crunch as possible, so fold gently. The filling should feel thick, slightly sticky, and absolutely delicious. Try not to eat it all before assembly.
Step 3: Melt and Temper the Chocolate
Chop your chocolate into small, even pieces. This helps it melt evenly.
If using a double boiler: place the chocolate over barely simmering water and stir gently until fully melted and silky. If using a microwave: melt in 30-second bursts, stirring between each, until smooth. Add coconut oil or cocoa butter and stir to combine — this gives the final shell a glossy, professional-looking finish.
Pro tip: Don’t let any water get into your melted chocolate. Even a single drop can cause it to seize up and become grainy and unusable.
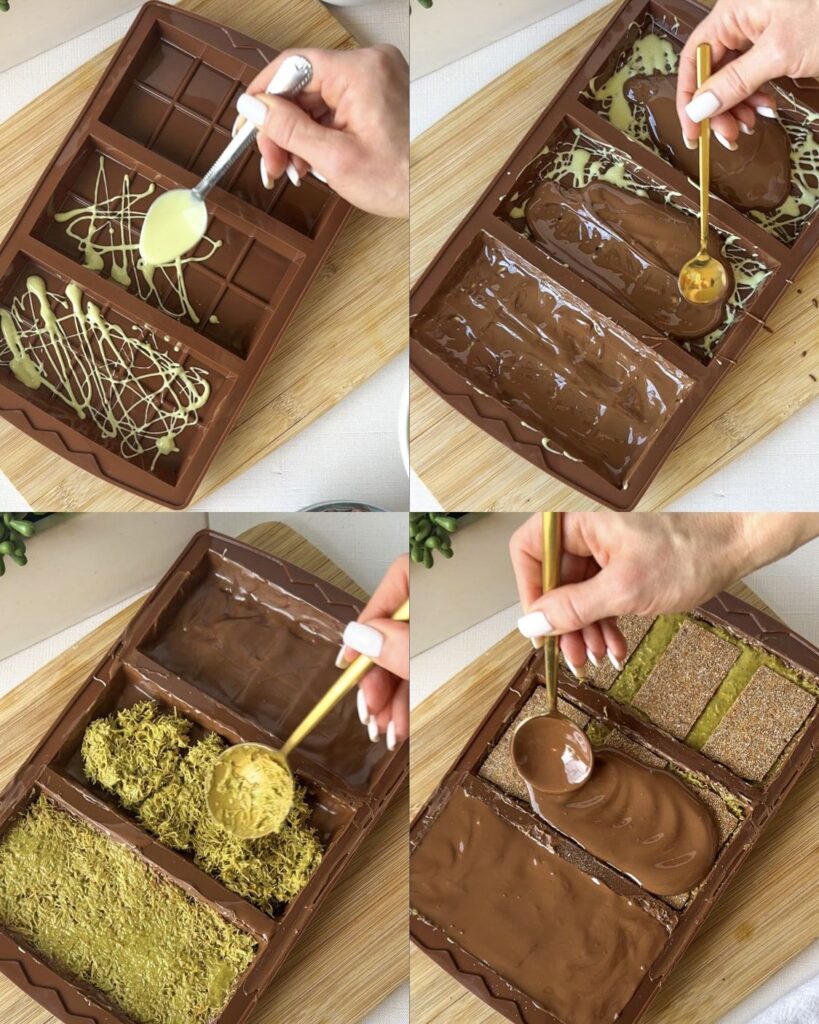
Step 4: Create the Chocolate Shell
Spoon a generous layer of melted chocolate into the bottom of each mold cavity. Use a pastry brush or the back of a spoon to push the chocolate up the sides, creating an even shell about 3–4mm thick.
Tap the mold gently on the counter a few times to release any air bubbles. Place it in the freezer for 10 minutes until the shell is fully set and firm.
This is your base layer, so make sure it’s thick enough. Thin shells will crack and break when you try to remove the bars.
Step 5: Add the Filling
Remove the mold from the freezer. Spoon the pistachio-kataifi filling into each cavity, pressing it down gently with your fingers or the back of a spoon. Fill each cavity about three-quarters full — you need room for the top layer of chocolate.
Smooth out the top of the filling as best you can. This makes the final bar look clean and neat when opened.
Step 6: Seal with the Final Chocolate Layer
Pour the remaining melted chocolate over the filling in each cavity. Spread it evenly with an offset spatula, making sure the chocolate reaches the edges and seals the filling completely.
Tap the mold again on the counter to eliminate air pockets and level the surface. Place the mold back in the freezer for at least 30 minutes, or in the refrigerator for 1 to 2 hours.
Patience here is everything. The longer you let it set, the cleaner the bars will release from the mold.
Step 7: Unmold and Finish
Once fully set, gently flex the silicone mold and pop the bars out. They should release cleanly with a satisfying snap.
If you want to decorate, now is the time. Drizzle white chocolate, sprinkle crushed pistachios, or add a pinch of flaky sea salt across the top. The finishing touches are completely up to you.
Tips for Perfect Chocolate Bars
- Use high-quality chocolate: This is the star of the show. Cheap chocolate will give you a waxy, unpleasant result. Spend a little more and you’ll taste the difference in every single bite.
- Toast the kataifi properly: Pale, under-toasted kataifi will be chewy and bland. You want it deeply golden and crispy — that’s where all the flavor and texture come from.
- Let the filling cool before assembling: Warm filling can melt the chocolate shell. Make sure everything is at room temperature or slightly cooler before layering.
- Work fast with the chocolate: Once melted chocolate starts to cool, it thickens up quickly. Have your mold ready before you start melting.
- Freeze between layers: This is the trick that gives you clean, professional-looking bars. Set each layer before adding the next.
Flavor Variations
Once you’ve mastered the classic version, it’s fun to experiment with different flavor profiles. Here are some delicious twists to try.
- White Chocolate Dubai Bar: Replace the dark chocolate shell with good-quality white chocolate. The sweetness plays beautifully against the nutty, slightly savory filling.
- Hazelnut Kataifi Bar: Swap half the pistachio cream for Nutella or a quality hazelnut spread. Add toasted hazelnuts into the filling for extra crunch.
- Salted Caramel Dubai Bar: Add a thin layer of thick salted caramel between the kataifi filling and the top chocolate layer. The sweetness level goes through the roof in the best possible way.
- Cardamom Rose Bar: Stir half a teaspoon of ground cardamom and a few drops of rose water into the pistachio filling. This version leans into traditional Middle Eastern flavors and is completely stunning.
- Dark Chocolate Espresso Bar: Add a teaspoon of instant espresso powder to your melted dark chocolate for a mocha edge. This pairs incredibly well with the nutty pistachio filling.
Common Mistakes to Avoid
- Using thin chocolate layers: If your shell is too thin, the bars will crack and fall apart when unmolded. Always build up a generous base and side layer.
- Not cooling between layers: Skipping the freezer step between the base layer and filling leads to mixing and a messy interior. Don’t rush.
- Over-toasting the kataifi: There’s a fine line between golden and burnt. Watch it closely in the pan and stir constantly. Burnt kataifi smells and tastes bitter.
- Using cold pistachio cream straight from the fridge: Cold filling is stiff and hard to work with. Let it come to room temperature so it spreads easily into the mold.
- Not sealing the edges properly: If the top chocolate layer doesn’t seal all the way to the sides, the filling can fall out when you bite into it. Use the back of a spoon to press the edges firmly.
Ingredient Substitutions
Can’t find something on the list? No problem. Here are some easy swaps that work really well.
- Kataifi pastry: If you can’t find kataifi, you can use shredded phyllo dough, crushed shredded wheat cereal, or toasted vermicelli noodles broken into small pieces. The crunch won’t be identical, but it’ll still be delicious.
- Pistachio cream: Pure pistachio paste from a jar works perfectly. Alternatively, blend 1 cup of raw, unsalted pistachios with 2 tablespoons of honey and 1 tablespoon of coconut oil in a food processor until smooth.
- Tahini: If you don’t have tahini, almond butter or sunflower seed butter can step in. The flavor will shift slightly but still works well.
- Dark chocolate: Milk chocolate alone works if you prefer something sweeter. Semi-sweet chocolate chips are also a solid option in a pinch.
- Coconut oil: Any neutral oil like sunflower or vegetable oil works the same way as a melting agent.
How to Store Dubai Chocolate Bars
- At room temperature: These bars can sit at room temperature in an airtight container for up to 3 days as long as your home isn’t too warm. Keep them out of direct sunlight.
- In the refrigerator: For longer shelf life, store them in a sealed container in the fridge for up to 2 weeks. Let them come to room temperature before eating for the best flavor and texture.
- In the freezer: You can freeze these bars for up to 3 months. Wrap each bar individually in plastic wrap, then store in a zip-lock bag. Thaw overnight in the refrigerator.
Important tip: Avoid storing these bars anywhere near strong-smelling foods. Chocolate absorbs aromas easily, and you don’t want your pistachio bar tasting like leftover garlic bread.
What to Serve With Them
Dubai chocolate bars are rich and satisfying on their own, but if you’re putting together a dessert spread or entertaining guests, here are some great pairing ideas.
Serve them alongside a small pot of strong Arabic coffee or cardamom tea. The slight bitterness of the coffee cuts through the sweetness and brings out the chocolate flavor beautifully.
They also pair wonderfully with fresh berries — raspberries and strawberries in particular. The tartness of the fruit balances the richness of the bar.
If you’re hosting a summer gathering, these bars can be part of a broader dessert and snack table. You might also love checking out these easy summer BBQ side dishes to round out your menu with something savory and crowd-pleasing.
For a full spread of shareable finger foods, a healthy spicy chicken sandwich recipe makes a great main alongside these chocolates as a sweet finish.
Pro Tips From a Food Blogger
- Buy extra chocolate: Melted chocolate has a way of disappearing faster than expected. Having extra on hand saves you a last-minute panic.
- Use a kitchen scale: Chocolate and fillings are best measured by weight, not volume. A digital scale makes everything more accurate and consistent.
- Warm your spatula: Slightly before smoothing out the top chocolate layer. A warm spatula glides through chocolate more cleanly and gives you a smoother finish.
- Make these in batches: Once you’ve set up your station, making 12 bars takes almost the same effort as making 6. They store well, and you’ll be glad you have extras.
- Photograph before eating: Snap your Dubai chocolate bar mid-break for that iconic viral-worthy shot. The interior is gorgeous, and you deserve the credit for making it.
Frequently Asked Questions (FAQs)
What is a Dubai chocolate bar made of?
The original Dubai chocolate bar is made with a dark chocolate shell filled with a mixture of pistachio cream and kataifi pastry — a crispy shredded wheat used in Middle Eastern desserts. Some versions also include tahini for added depth.
Where can I buy kataifi pastry?
Kataifi is available at Middle Eastern grocery stores, specialty food shops, and online retailers. It’s usually found in the frozen or refrigerated pastry section.
Can I use milk chocolate instead of dark chocolate?
Yes, absolutely. Milk chocolate gives you a sweeter, creamier bar. Many people actually prefer the milk chocolate version. You can also mix the two for a balanced flavor.
How long do homemade Dubai chocolate bars last?
Stored in an airtight container in the fridge, they last up to 2 weeks. At room temperature, they’re best enjoyed within 3 days.
Why does my chocolate look dull instead of shiny?
Dull chocolate usually means it wasn’t tempered properly or got too warm during melting. Adding a teaspoon of coconut oil helps restore shine. Using better-quality chocolate also makes a noticeable difference.
Can I make these dairy-free?
Yes. Use dairy-free dark chocolate, swap butter for coconut oil when toasting the kataifi, and check that your pistachio cream is dairy-free (most are).
Can I make the filling in advance?
Absolutely. The toasted kataifi and pistachio mixture can be made 2 to 3 days ahead and stored in the refrigerator in a sealed container. Bring it to room temperature before using.
What size mold should I use?
A standard chocolate bar mold with cavities around 13cm x 4cm works perfectly. Bigger molds give you that dramatic, thick Dubai chocolate bar look.
Is this recipe beginner-friendly?
Yes! As long as you follow the steps and don’t rush the setting times, this recipe is very achievable for beginners. The most important things are using quality chocolate and toasting the kataifi until it’s properly golden.
Why is the Dubai chocolate bar so expensive in stores?
The original FIX Chocolatier bars are handmade in small batches with premium ingredients. Limited availability and high demand have made them a luxury item. That’s exactly why making them at home is such a great alternative — you get the same experience for a fraction of the cost.
Final Thoughts
The Dubai chocolate bar is more than a trend — it’s genuinely one of the best things you can make in your kitchen right now. The combination of silky pistachio cream, golden crispy kataifi, and rich dark chocolate creates something that feels truly special every single time.
What makes this recipe even better is that it’s completely customizable. Once you’ve got the base technique down, you can experiment with different chocolate types, fillings, and toppings to make it entirely your own.
Whether you’re gifting these bars, impressing guests, or simply treating yourself (which is always valid), this recipe delivers results that look stunning and taste even better.
So go ahead — make the viral bar at home. You won’t regret a single bite.
Happy chocolate making! If you try this recipe, share your results and let others know how it turned out.


